Register
The Register tab allows you to make direct sales by adding line-items (either via the keypad or from your product list) and then quickly charge the customer. You can navigate between the keypad, items and scanner screen by completing either of the following:
- Swipe left and right on the screen to switch between different pages.
- On the keypad screen, tap on to switch to the items page. On the items page, you can tap on the keypad and scanner buttons to switch to those respective pages.
The Register tab is only visible in Retail modes.
Keypad
The keypad allows you to quickly add miscellaneous items to your basket without having to configure product descriptions in advance.
As you type into the keypad, that value will automatically get added to your active basket. If you'd like to add multiple items to your basket you can tap the + button to the right of the amount display.
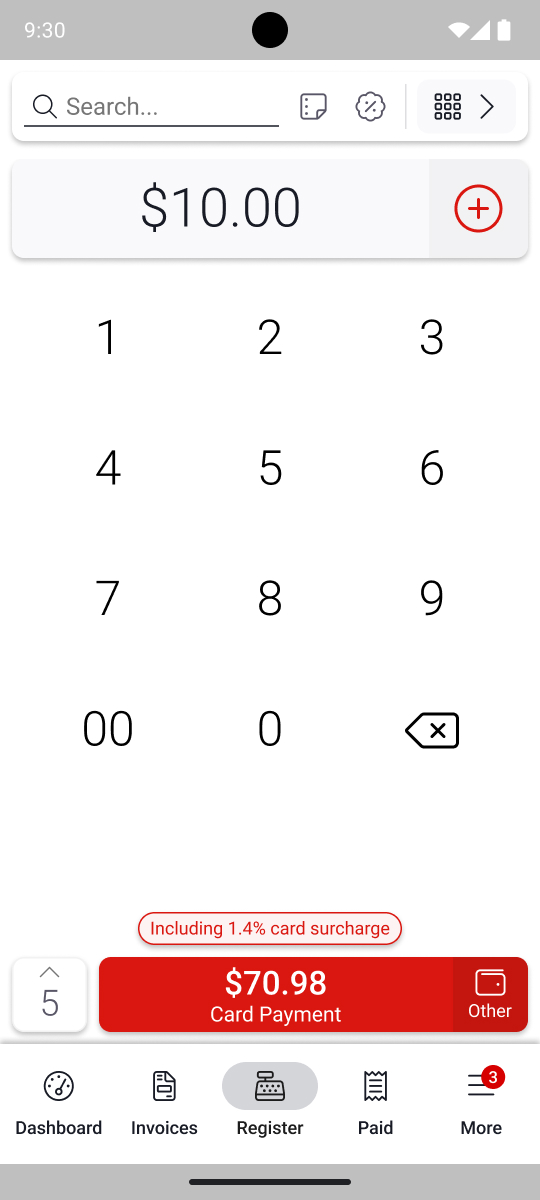
Customise your line-item
When manually entering an amount for a sale, you can customise it by tapping the amount displayed in grey at the top of the screen. You can modify the name, adjust the quantity, add notes, and more.
Items
The Items tab will be hidden in Simple mode.
Once you've created products, you can add them directly to your active basket via the Items list.
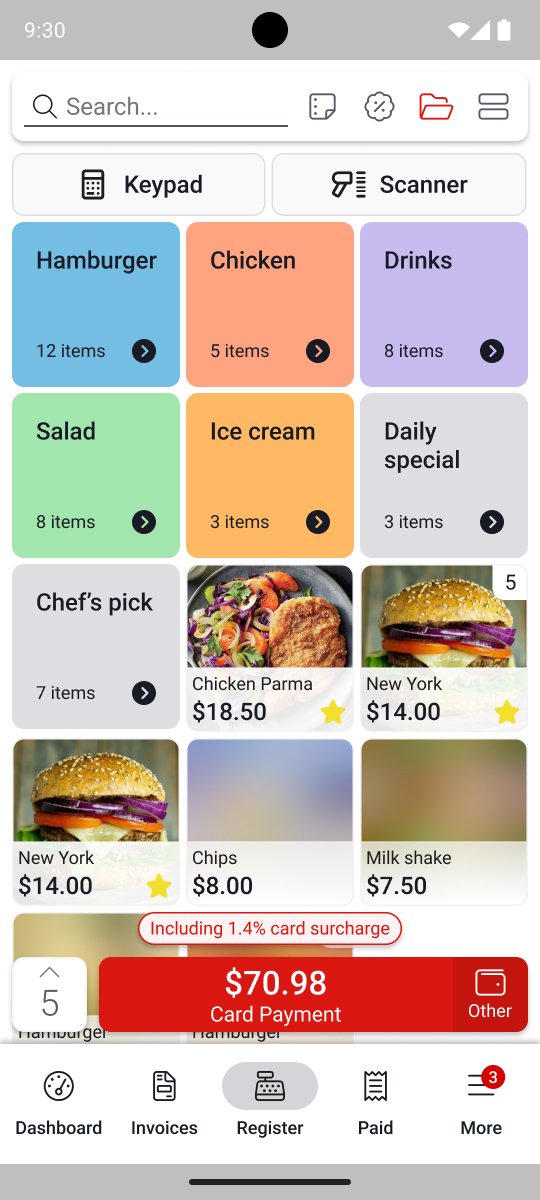
Simply tap on an item to add it to your basket. When you've added an item the quantity of that item will be displayed on the item image. If you want to modify that line-item, you can tap on that quantity indicator.
If you long-press an item this will pop-up an editor to let you modify the line-item before it's added to your basket. This is useful if you want to customise that line-item while you add it or if you want to have multiple line-items for a single type of item. If you have multiple line-items for a single type of item then you'll only be able to edit those line-items from the basket.
Grid or List
You can choose to display your items in either a grid or a list by pressing the grid/list toggle at the top right of the items tab.
Categories
If you've added any categories for your items then you can turn categories on or off using the category toggle at the top right of the items tab.
Scanner
If you've added any barcodes to any of your items then you'll see a Scanner tab that allows you to quickly add items by scanning barcodes. Simply select this tab and scan the relevant barcode to add that item to your active basket.
The Basket
You can view the current line-items in your active basket by tapping on the basket at the bottom left of the screen.

From here you can delete (by swiping) or modify (by tapping) your line-items.
You can also add notes or clear the sale entirely using the button at the bottom of the page.
Editing Line-Items
You can edit a line-item by either:
- Tapping on a line-item from the basket
- Tapping on the quantity count on an item in the Items tab
- Long-pressing an item on the Items tab to add it as a new line-item
- Tapping on the grey amount on the Keypad
In any of these cases the line-item details screen will appear. From here you can modify the Quantity, Price, Note, add a discount, choose any modifiers, and delete the line-item entirely. If this is a miscellaneous item then you can also modify the Name.
Sales Reference
On the right of the search bar, a sales reference menu can be accessed by tapping on .
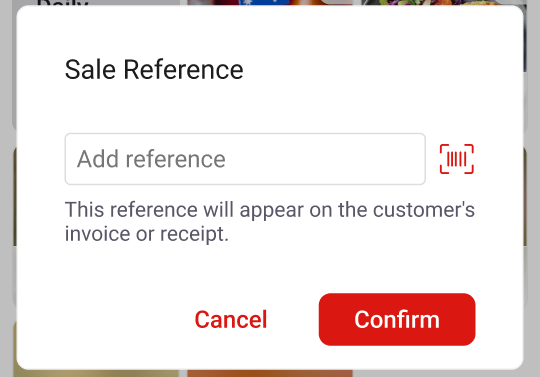
You can enter a sale reference for the sale being completed. This can be entered either through text input or can be scanned from a serial barcode or QR code. For example, this may be a customer or order reference number from another system you use.
Sales Reference Validation
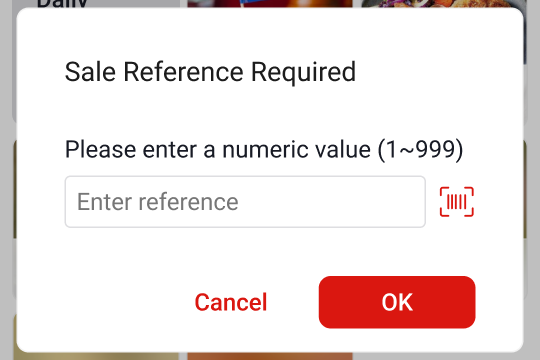
If sales reference validation is enabled from the EFTPOS Air portal, you may be prompted to enter a sale reference within a specified range or criteria, as outlined on the portal.
When a valid sales reference is entered, this reference will be added to the sale as expected. However, if an invalid sales reference is entered, the prompt will either reappear (iOS) or indicate an error (Android).
The sales reference validation prompt will also appear when issuing quotes and invoices, if enabled from the EFTPOS Air Portal.
Discounts
Once you've created some discounts you can apply them to either the entire sale or to individual line-items.
Sale Discounts
To apply a discount to the entire sale tap the discounts and surcharging icon next to search then choose the discount you want to apply to the sale. You can apply percentage or amount-based discounts to the sale. You can also create a custom discount by selecting Custom Item Discount and entering either a percentage or dollar amount and a name.
To delete a sale discount, go to the active basket and tap on the Sale Discount line-item, you will be prompted to delete it.
Item Discounts
You can apply a discount to an individual line-item while editing any line-item. Simply select a discount from under the Discounts heading or create a custom one by tapping the Custom Item Discount button.
Item discounts can only be percentage based, so any amount-based discounts will not appear in the available discounts.
Note
Discounts will never result in the total value of the sale dropping below $0.00. This means if you add a $10 discount to a $5 sale, then the resulting value of the sale will be $0.00.
Surcharges
A surcharge can be used to add an additional cost to a sale or invoice.
Surcharges operate the same as discounts, and can also be applied to either the entire sale or to individual line-items.
Sale Surcharges
To apply a surcharge to the entire sale tap the discounts and surcharges icon next to search then choose the surcharge you want to apply to the sale. You can apply a percentage or amount-based surcharge to the sale. You can also create a custom surcharge by selecting Custom Item Surcharge and entering either a percentage or dollar amount and a name.
To delete a sale surcharge, go to the active basket and tap on the Sale Surcharge line-item, and you will be prompted to delete it.
Item Surcharges
You can apply a surcharge to an individual line-item while editing any line-item. Simply select a surcharge from under the Surcharges heading or create a custom one by tapping the Custom Item Surcharge button.
Item surcharges can only be percentage based, so any amount-based surcharges will not appear in the available surcharges.
Categories
Using Categories, you can sort your view by all Items or choose to group them by category. Simply tap on the to organise Items into category folders.