Items
Here you can create and manage your list of products available in both invoices and the register.
Your items are displayed here similarly to the Register tab or when adding items to an invoice. You can turn categories on and off and swap between the grid / list views using the buttons at the top right of the screen.
Create Item
To create a new item simply press the (+) button.
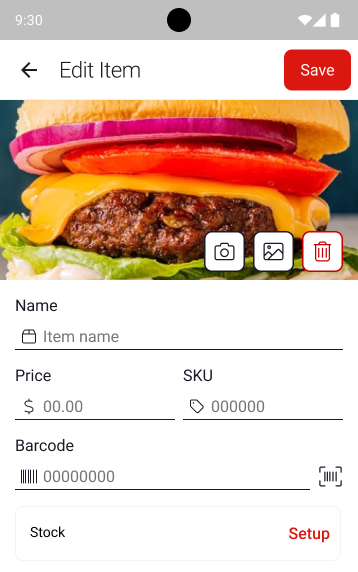
You must provide a name for the item, but all the other fields are optional.
| Field | |
|---|---|
| Image | You can take a photo or use an image from your mobile device as a visual identifier for the item. Once you take a photo or choose an image, you'll be prompted to crop the image to a square. Tap Crop once you're finished. |
| Name | This is the name of the product and must be provided. |
| Favourite | If you check the star next to the name then this item will always appear first in lists. |
| Price | Enter the sale price for the item. If you leave this as $0.00 then you will be prompted to enter a price when adding this item to the basket. |
| SKU | SKU means "Stock Keeping Unit" and is your own internal reference number for the item (if you have one). |
| Always Prompt | When enabled, you'll always be prompted to enter a price, quantity, and other details when adding this item to a sale or invoice. |
| Barcode | If your items have barcodes you can enter this to make it faster when adding items to your basket. You can tap the barcode icon on the right to simply scan your items barcode rather than entering it numerically. |
| Add Category | This allows you to add the item to a category. Read more about categories in the Categories section. |
| Add Modifier Sets | This allows you to choose which modifier sets apply to this item. Read more about modifiers in the Modifiers section. |
| Tax | This allows you to override the default tax for this item. |
Once you've completed the above steps, simply hit Save to finish.
Quantity Based Items
If you'd like to be able to sell items based on a decimal quantity, such as 1.2 kilograms of apples, simply setup your item with an appropriate name, a price per unit (eg: price per kilogram), and then enable Always Prompt. Every time you add this item to the basket, you'll be prompted to enter the quantity, which can be entered as any decimal value (eg: 1.5).
For example:
- Name: Apples per kg
- Price: $4.90
- Always Prompt: enabled
Edit Item
To edit an item simply select it from the list and make any changes as above.
You can also delete the item by tapping the Delete Item button at the bottom of the edit screen.
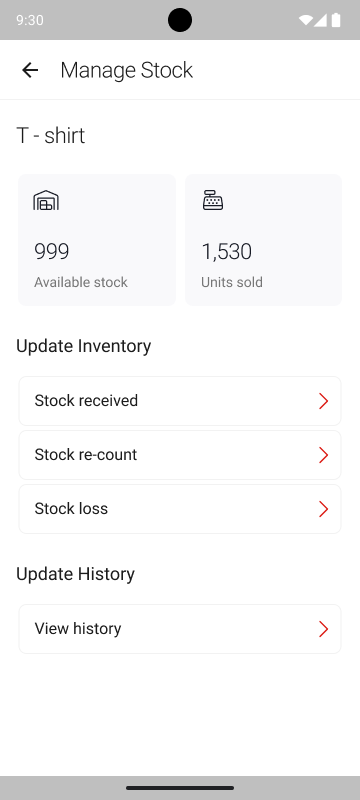
Stock Management
EFTPOS Air lets you keep track of and manage the stock levels of your products and services. To access the Stock Management system, edit an item and tap on the Set up button in the Stock section. Once set up, the stock level for the item will be displayed on the Edit Item screen.
Stock Counts
Select Stock to open the Stock Management screen - which displays the item's current and sold stock. Stock counts can be adjusted through any of the options under the Update Inventory menu.
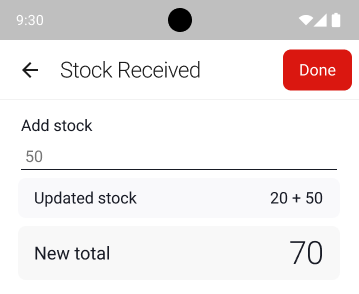
The Stock Received menu prompts you to enter any additional stock that has been added to your inventory. Updating this will indicate the updated stock count.
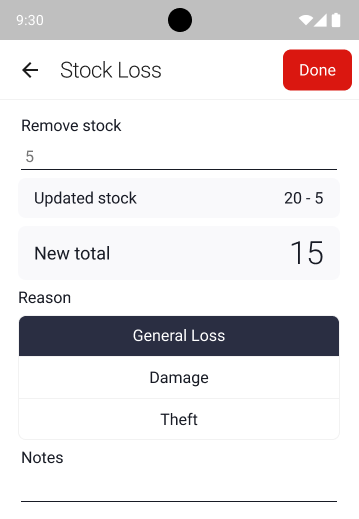
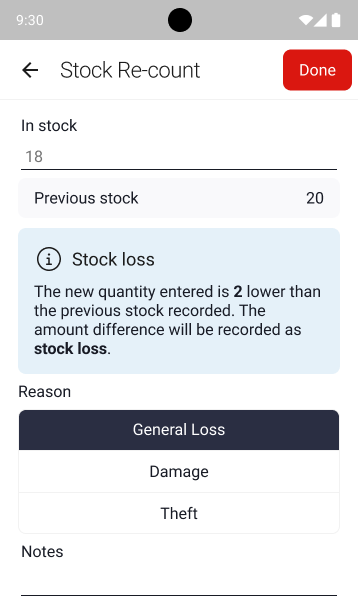
The Stock Loss menu prompts you to enter a count of stock that has been lost (not sales). Updating this will indicate the updated stock count but also allows you to enter a reason for the loss.
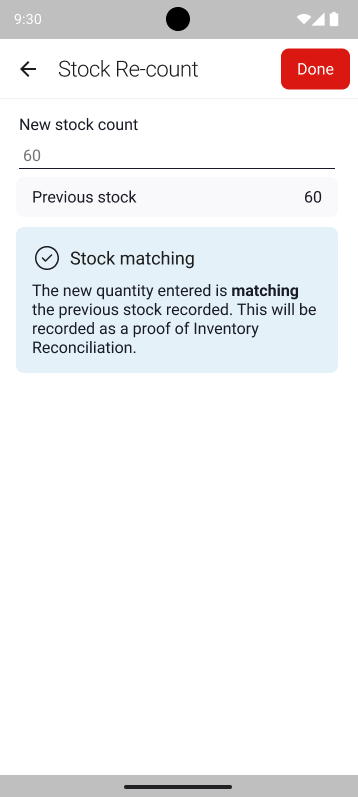
The Stock Re-count menu prompts you to enter the current stock level and contrasts it with your previous stock level. If the count entered is lower than the previous count, this will be indicated as a Stock Loss, but will be recorded as Stock Received if the count is higher.
Alternatively, if the previous stock count matches the new stock count, this will be marked as a stock count verification in the Update History tab.
Stock Update History
Stock updates can be tracked through the Update History menu. This menu includes all stock changes, including additions, losses and sales.
Each entry includes a date, time, user email address and units affected.
